TM 9-2320-260-34-2
15-19. CONTROL VALVE MAINTENANCE (Contd)
c. Cleaning and Inspection
1.
For general cleaning instructions, refer to para. 2-8.
2.
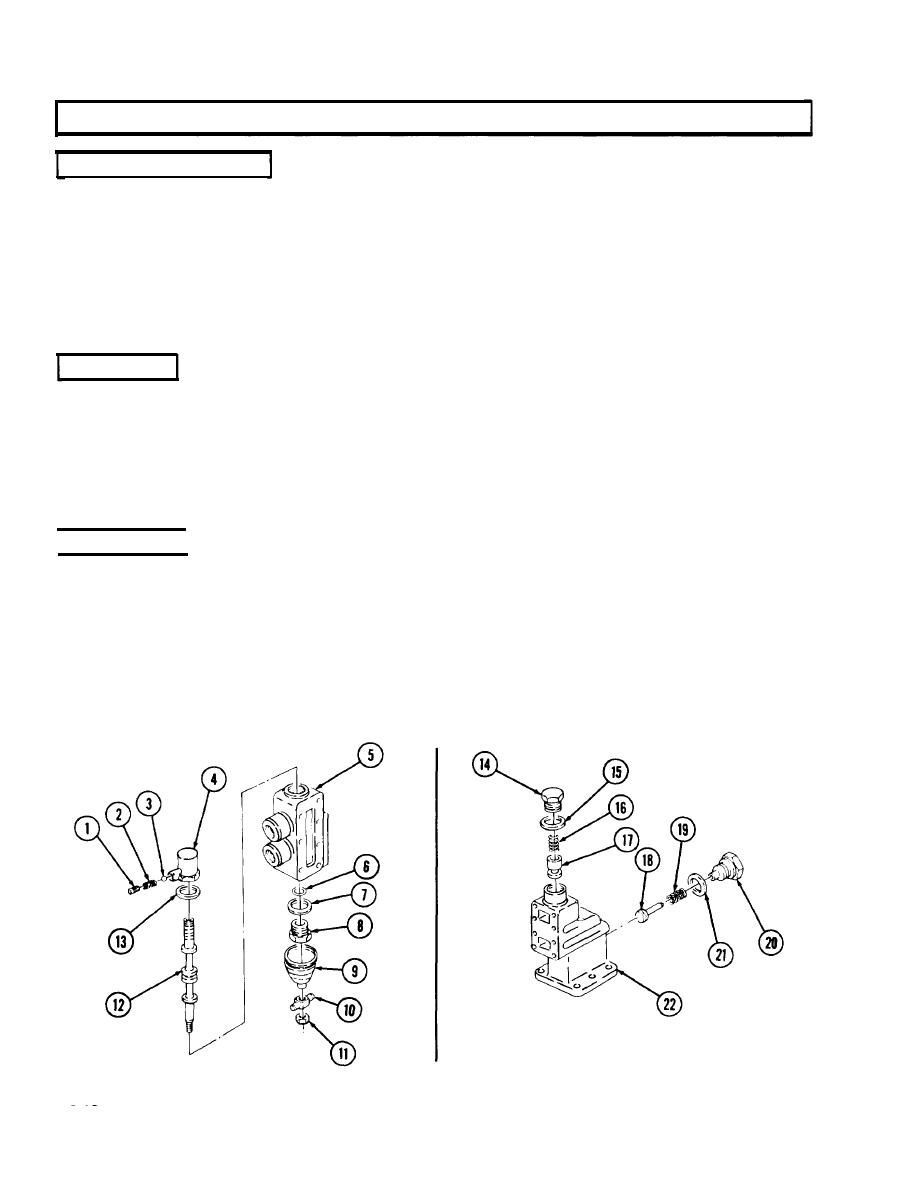
Inspect adapter (22) for breaks, cracks, and pitted or worn bores. Replace adapter (22) assembly
if broken, cracked, or bores are pitted or worn.
threads are damaged.
4. Inspect control valve body (5) for cracks, scratches, and worn bore threads. Replace control valve
body (5) if cracked, scratched, or bore threads are worn,
5. Inspect spool (12) for scratches, nicks, and burrs. Replace spool (12) if scratched, nicked, or burred.
d. Assembly
1. Install spool (12) in control valve body (5).
2. Install new spacer ring (13) and valve cap (4) on control valve body (5) and spool (12).
3. Install ball (3), spring (2), and plug (1) in valve cap (4).
4. Install new O-ring (6), new spacer ring (7), plug (8), boot (9), trunnion (10), and nut (11) on spool (12).
5. install plunger (18), spring (19), new spacer ring (21), and plug (20) on adapter (22).
6. Install plunger (17), spring (16), new spacer ring (15), and plug (14) on adapter (22).
e. Installation I
I
1. Install two manifolds (23) on control valve (24).
2. Install new gasket (34) and valve head (26) on control valve (24) with four new lockwashers (27),
screws (28), four new lockwashers (31), and two screws (29) and (30).
3. Install new gasket (34), control valve (24), new gasket (38) and cover (37) on mounting bracket (33)
and reservoir (32) with seven new lockwashers (36) and screws (35).
4. Install bushing (43) and drain valve (42) on tee (44).
5. Install tee (44), two elbows (41), and four unions (40) on two manifolds (23).
6. Connect six hoses (39) on four unions (40) and two elbows (41).
15-62


