
TM 9-2320-272-24-3
4-113. REAR BRAKE ACTUATOR REPAIR (Contd)
NOTE
Apply a light film of GAA grease to all metal parts, lips of seals,
and plunger housing bores prior to assembly.
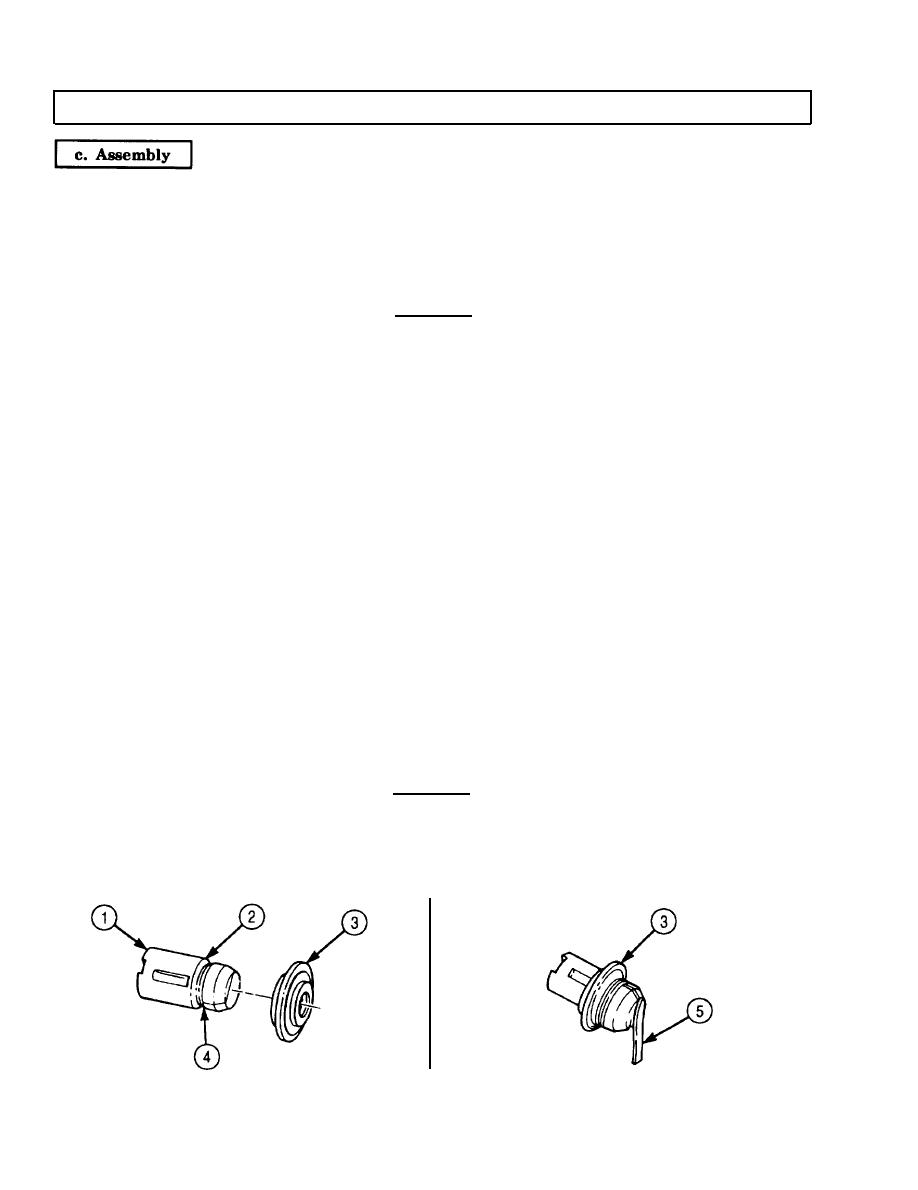
1.
Slide new seal (3) on new anchor plunger (1) until inner seal lip is in second plunger groove (4) and
outer seal lip is in first plunger groove (2) of anchor plunger (1).
2.
Place a piece of tape (5) over slot of anchor plunger (1) to protect lips of seal (3).
CAUTION
Anchor plungers and adjusting plungers are located vertically,
opposite one another. Incorrect location will prevent automatic
adjuster from working properly.
Remove tape from anchor plungers (1).
3.
Align guide groove (10) of anchor plunger (1) with guide screw hole (9) of plunger housing (6).
4.
Install anchor plunger (1) in plunger housing (6). Use hammer and 1-3/4-in. (44.45-mm) wrench
5.
socket to seat seal (3).
Install new gasket (7) and new guide screw (8) on plunger housing (6). Tighten guide screw (3)
6.
15-20 lb-ft (20-27 Nm).
Align guide groove (12) of adjusting plunger (16) with adjusting paw1 hole (17) of plunger housing (6).
7.
Install adjusting plunger (16) in plunger housing (6).
8.
NOTE
Adjusting pawls have teeth and flats on one end and chamfered
edge on the other end. When performing step 9, ensure adjusting
paw1 is positioned with chamfer toward sleeve to align paw1 and
sleeve teeth.
Install new adjusting paw1 (18) and new spring (19) in plunger housing (6) with new gasket (20) and
9.
new hollow screw (21). Tighten hollow screw (21) 15-20 lb-ft ( 20-27 Nm).
Using adjusting bolt (13), rotate adjusting sleeve (15) and check for proper teeth meshing. If teeth
10.
are properly meshing, a clicking sound and ratchet feel will be indicated.
11.
Remove adjusting bolt (13).
Position inner lip of new adjusting plunger seal (14) in plunger housing (6). Using hammer and
12.
1-3/4-in. (44.45-mm) wrench socket, seat adjusting plunger seal (14).
CAUTION
Do not bottom adjusting bolt against seal. Seal will be damaged.
Install new adjusting bolt (13) in adjusting sleeve (15). Tighten adjusting bolt (13) until head is
13.
showing above adjusting plunger seal (14).
Install new wedge assembly (11) in back of adjusting plunger housing (6). Check for proper
14.
operation of wedge assembly (11) and adjusting plungers (16).
4-602

